
When I developed my first website in 1995 there wasn’t much involved – it was basically just HTML with a few animated GIFs, text and links. There wasn’t even CSS to worry about and no JavaScript. Today that is NOT the case. Today not only do we have HTML, CSS and Javascript, but we also have SASS, LESS, Bootstrap, JQuery, Angular, TypeScript, minification, concatenation, image optimization and the list goes on and on. All these extras require tasks to be run either to compile into what the browser will understand as is the case with SASS, LESS and Typescript. Or perform a specific action such as minification. In addition, the task can also be to simply add a specific library or framework that we always use in our website such as jQuery. This is where using Gulp comes in.
Gulp is a task manager that runs these operations and so many more.
In this article and the several to follow I will go through the steps of setting up Gulp, how to use it, how to manage it and some of the key tasks that you might want to include in your web development. After all of this is done, you will see at the end of this article that in order to recreate our environment for another website all we have to do is issue one command – “npm install”
While there are several initial set-up pieces to worry about with Gulp, the key thing to remember is that all you need to manage the tasks is simple JavaScript code.
Install Node.js
So the first piece we need is Node.js. While Node.js serves a lot of purposes, all we need to use this for is to run JavaScript on our computer and to use NPM (Node Package Manager) which comes with it. Packages are the utilities that Gulp uses to run tasks.
 Simply go to https://nodejs.org to download. You can download the LTS or the Current version. I usually do the current version. So what’s the difference between the two versions? Well according to the Github Node.js Release Notes they are as follows…
Current – “Current release lines beginning in October each year have a maximum support life of 8 months. Current release lines beginning in April each year will convert to LTS (see below) after 6 months and receive further support for 30 months.”
LTS (Long Term Support) – “LTS releases are less frequent and will attempt to maintain consistent major and minor version numbers, only incrementing patch version numbers. There are no breaking changes or feature additions, except in some special circumstances. “
Just go through the defaults and when it is finished installing you can test to make sure it was successful by opening a command line terminal (I am using Git Bash which comes with Git – https://git-scm.com/) – or you can simply use the “Command Prompt” that comes with Windows. I have also seen some people use Cmdr – http://cmder.net/   Whatever you choose is up to you, just be aware that you will be using the terminal when working with Gulp, so use what ever you are comfortable with or experiment with various ones and see what you like best.
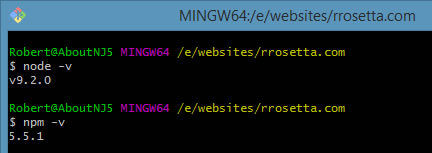
Within the terminal type “node -v” which should give the version of Node.js which you just downloaded and installed. After that type “npm -v” and you should see the version of NPM that was installed.
Install Gulp Globally
Now time to install Gulp – at least globally. Again in the terminal window type the following – “npm install gulp -g“. The “-g” will tell npm to install this globally and add it to your path. After it finishes running, you can confirm it has properly installed by typing “gulp -v”
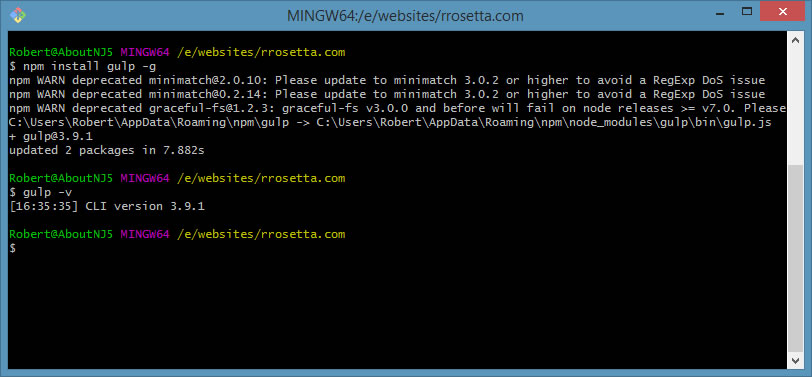
The CLI version indicates that this is the global version.
Setting Up the package.json File
So now we will be setting up things specific to our website. First in the terminal we need to move to the root level of your website – not the public section though.  For instance – if you have something like e:/websites/domain.com/public – then you want to type do “cd /websites/domain.com“. You can also simply type “cd ” and then drag the directory from file manager to the terminal instead of typing it all out.
Now that you are in the correct directory, we will create the package.json file by typing “npm init” in the terminal. NOTE: the directory the package.json file is being created in can NOT have spaces or any characters that require encoding- so “domain.com – dev” would not work. You can do “domain.com-dev“ This is because – as you will see – it takes this directory to come up with default package name.
After executing “npm init” it will go through a number of fields where you can enter information about the package. The only ones required are “package name” and “version”. I use all the defaults except for “author” – there I enter my name. After you run through all the fields. it will display the created package.json file.

If you look in your directory, you should now see the package.json file.

The package.json file defines all the dependencies that our website requires. Some dependencies are for production, and some are only required while developing the website. For instance – if you are using Bootstrap 4.0 beta, that is a production dependency. If you are using SASS that is development dependency. If you are using BrowserSync that that another development dependency while jQuery would be production dependency.
As you can see all package.json is is a simple JSON object.
We will now create our FIRST dependency in the package.json file – the local copy of Gulp.
Installing a Local Copy of Gulp
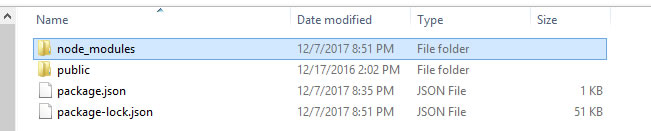
To install the local copy you need to execute “npm install gulp –save-dev” within the command terminal.  After you run this, you will notice a couple of things. In your website directory you will see a new subdirectory was created call “node_modules” and a new file “package-lock.json”
.
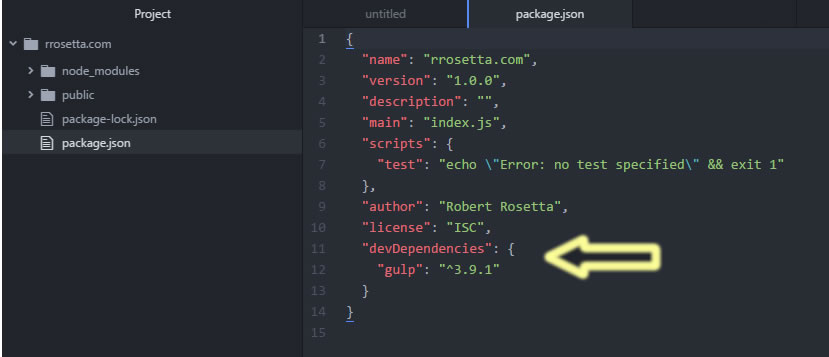
Also if you look at your package.json file you will see that it also added some information concerning Gulp.
The subdirectory “node_modules” contains the default packages for Gulp and when you install any new packages, such as Boostrap, or Gulp-SASS, they will be added to the “node_modules” folder. The “package-lock.json” file lists out all of these default packages while the “package.json” file contains the information for the packages you install such as Gulp.
What this newly created section is saying is that Gulp is a development dependency and we are requiring version 3.9.1 or greater. If you remove the ^ (carat) from in front of the version number, it will ONLY install that specific version, otherwise it will install the latest version. Currently version 3.9.1 is the latest stable version for Gulp.
 Reinstalling Your Dependencies
Now say that the “node_modules” subdirectory and the package-lock.json file get deleted, or you just want to install the same set up for another website, well instead of having to repeat everything you just went through all you have to do is execute “npm install“. It will read your “package.json” file, see that Gulp is a development dependency and needs to be installed. It will check to see if the version of Gulp exists and if it doesn’t, then it will install it.  If you are trying to create the environment on a new website, just copy the package.json file over to that new website’s root directory – such as e:/websites/domain2.com and execute “npm install”
The Next Step – Using Gulp
Okay, so that was a lot of set up, but we had to get that out of the way.  This was really a one time deal for the most part. The next article will contain how to use Gulp. Right now I think this will be a three or four sections- “Part 1: Setting up Gulp“, “Part 2: Using Gulp“, “Part 3: Key Packages“, “Part Four: Organizing Gulp“.  I felt it would be better to break this up so people could easily look at the article that they are specifically interested in instead of having to scroll through a single HUGE article.