Well for years I’ve used Dreamweaver, not only to design sites, but also to write PHP code. Â Well with doing Zend Framework and OOP Â and getting serious with PHP, Dreamweaver just doesn’t cut it as a code editor anymore. Â Dreamweaver is great at doing webdesign, which is what it’s primary function is and I will continue to use it for that, but for PHP coding, I will now be using Eclipse with the Aptana Plugin.
One thing I was very impressed with was Eclipse’s complete melding with the PHP language, and the code I am developing. Â It is a great way to learn about various PHP functions and interestingly enough – the Zend Framework since I am now working with that.
Key Features
- Color coding (both display and print)
- Integration with the PHP Language and Manual
- Auto-suggestions
- Easily find where functions/classes are used throughout your code
- Syntax error checking indicators, i.e, forgetting to use a semi colon, unbalanced parenthesis, etc.

To the left is the Project View or Workspace view, this allows you to easily move around your projects and open up your files. Â In the center is obviously the code view, how ever, as you can see – it contains two pop-ups. Â While I was typing the class definition, “class Bootstrap extends Zend_App…”, a list of available classes pop-up, as you type, it narrows this list down. Â By clicking on the list it will insert it into your code. Â You can also see that it also gives you a class definition. Â This is a great learning tool, especially for Zend. Â By using this, you can quickly gain a better knowledge of what classes and functions the Zend Framework offers, even as you are coding. The right hand side is the Outline view, this is an outline of your current file, showing all the classes, methods, properties, etc.
One thing to remember about all these panels, they are moveable – you so you can create your workspace to suit your needs, Â there are also many more panels, two of which are shown below.
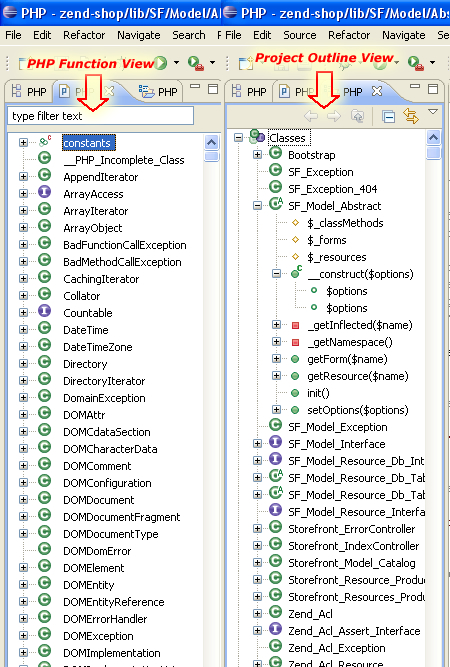
The PHP Function View shows the various classes and functions that are available to you from PHP. Â A great feature also is that if you right click and select “Open Manual” you can view PHP manual for the class, function or property right from within Eclipse. Â No more having to open up the manual and then search for it. Â It also works within the code view as well.
The Project Outline View is another very important view to have. Â This shows you all the classes, functions, properties used in your project. Â As you can see, I drilled down through the SF_Model_Abstract to see the properties and functions associated with that class.
This is just some of the best aspects I have seen with Eclipse that makes coding TRUE Object Oriented Programming in PHP so much easier.
Installation
Installation was a snap.  Simply go to the Zend Eclipse PDT page and select your environment.  Once you download the zip file, unzip it, there is no installation, so you just can run from where you extracted it.  If you are using Windows platform like I am, then I moved it into my programs and set up a Start Menu shortcut.  After installation, the key thing obviously is to experiment with it and test out it’s functionality.  I set up a couple of things for my code to work the way I want it to.
One issue I faced, when I initially set it up, my PHP Function View was not being populated. Â I looked on the web, where there were a lot of questions, but hardly any reasonable answers it seemed. Â To see if I could get it to work on my other computer, I installed in on there, Â this time instead of changing the default Workspace when Eclipse initially started, I kept it. Â The PHP Function View worked on my desktop installation. Â I went back to my laptop, deleted my project and restarted Eclipse, this time when it asked for my workspace, I kept it as the default. Â When I loaded up my project, the PHP Function View was properly populated. I don’t know if this was the issue or not, but it was the only thing I had changed. Â Also, the directory that I had initially changed the workspace to – was the root directory of where my projects are located, Â so that may have caused the problem.
FTP
Okay, FTP seems to be an issue with Eclipse.  After experimenting with numerous coding aspects – I was wondering, so how do I FTP my files between my machine and the server?  I don’t want to have to switch between Eclipse and Dreamweaver or another FTP program all the time and it is very odd that an IDE would not include this functionality.  So once again, I went to the web to search for it. There I discovered that Aptana Suite had a plugin for Eclipse and the two could work together. Simply go to the Aptana Suite Plugin page, copy the URL that is listed there, go back into eclipse, select help from the main menu and select “Install New Software” toward the bottom of the list. From there,  just paste the URL into the  “Work With” box and hit enter.  Click on the check box next to the Aptana Suite listed.  you can see the example below.

After clicking the next button several times, you will get to the license agreements. Â I had an issue with this screen, even though I selected my approval of the licenses, the “Finish” button still would not become active. Â I had to click back, go to the original screen, enter the URL in again and at that point the Finish button became active. Â I did not have to reclick on the next buttons, I just merely selected Finish on the panel above.
Once you restart Eclipse – Aptana should be accessible and you will be able to set up your FTP connections. Â I won’t go through everything, but you can get an idea of what the screen looks like when you switch from the PHP Perpspective to the Aptana Perspective below.
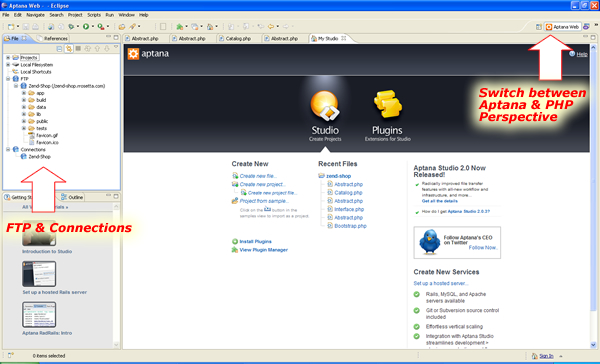
To the left is the FTP controls, this shows your remote server and also allows you to set up your connections. Â You can upload your files directly from the PHP Perspective using the Project/Workspace View. Â You can switch Perspectives easily by toggling the two controls in the upper right area of the window. Â If Eclipse is not displaying these, simply click on the icon next to them and choose “Other”, or it may already show “PHP (default)”. Â Â The Perspectives may also be hidden, because as with most of Eclipse, it draggable, sizeable, and moveable.
Video Tutorials
The Zend website has a number of great Eclipse Video Tutorials you can view, plus you can of course search on Google and YouTube. Â Below are two to get you started…
Using Eclipse+PDT as a PHP IDE Part 1
httpv://www.youtube.com/watch?v=VRFZpk-YHl4&feature=related
http://www.youtube.com/watch?v=VRFZpk-YHl4&feature=related
Using Eclipse+PDT as a PHP IDEÂ Part 2
httpv://www.youtube.com/watch?v=x8WnciHjXco&feature=related
http://www.youtube.com/watch?v=x8WnciHjXco&feature=related